How to Create and Connect a Custom 404 Page in Squarespace 7.1 (Step-by-Step Tutorial)
Pin to save for later
What is a 404 page?
A 404 page appears whenever a visitor tries to access a page that does not exist on your website.
Why should you create a custom 404 page in Squarespace?
A custom 404 page improves both user experience and search engine performance by helping visitors find what they are looking for and keeping them engaged:
Maintain your brand identity and reinforce trust even on error pages
Guide visitors back to your homepage or key pages, keeping them on your site longer
Reduce bounce rates, which positively influences search rankings
Provide navigation links or a search bar to help users find relevant content quickly
Showcase creativity or personality, making your site memorable while keeping visitors engaged
In this guide, we’ll show you how to create a custom 404 page in Squarespace 7.1 and connect it in just a few simple steps.
STEP 01:
Create a new page under “Not Linked”
From your Squarespace dashboard, go to:
Pages > Scroll down to Not Linked
Click the + icon and select Blank Page
Name the page something like “404” or “404 Page”

Example

STEP 02:
Design your page in the Fluid Engine Builder
A few things to keep in mind:
Include clear headline, similar to “Oops, this page does not exist”
Include a friendly message or buttons to guide visitors back to your key pages
Example:

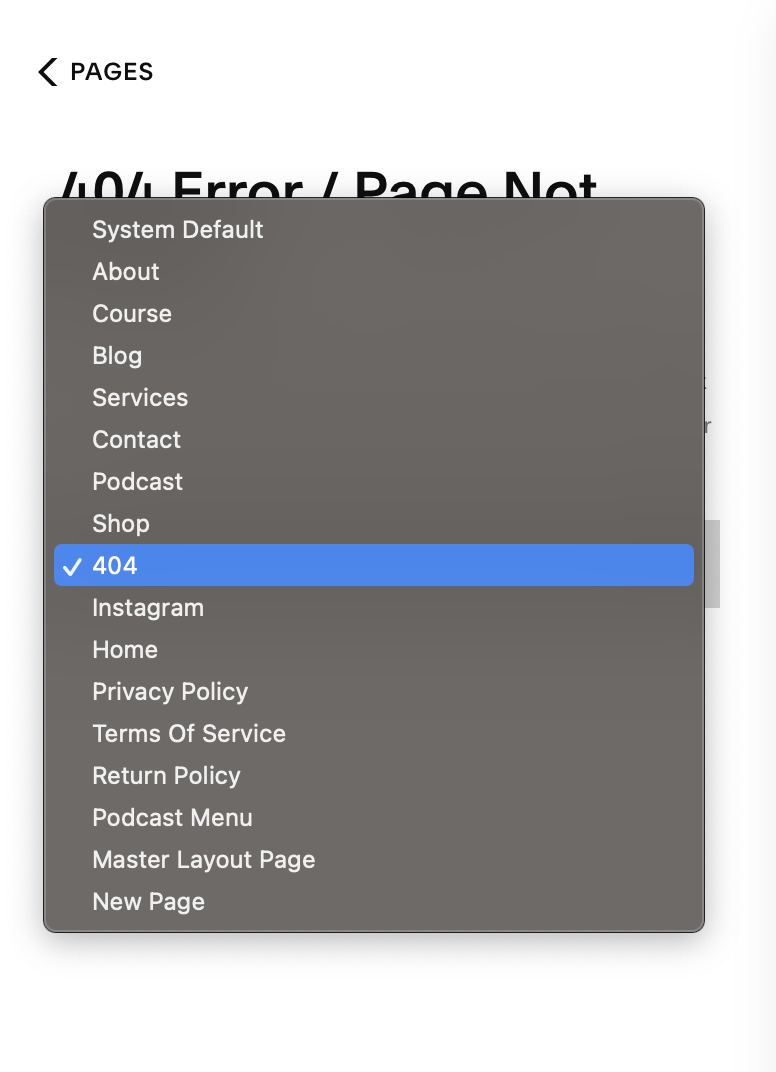
STEP 03:
Connect your custom 404 Page
To replace the default Squarespace 404 page with your custom design, go to:
Pages > Scroll down to System Pages > 404 Page
Select your 404 Page from the dropdown
Save!
STEP 04:
Test your 404 Page
Open a new browser tab
Enter a URL on your site that does not exist, for example: www.yourwebsite.com/nonexistentpage
Check that your custom 404 page appears and that buttons, links, and navigation elements are all going to the right place.
Thanks for reading!
Did this tutorial help? Consider buying me a coffee as thanks! 🥰
Use discount code STYLEDSQUARE10 to save 10% off your Squarespace Subscription!
* Disclaimer: This post contains affiliate links. If you purchase through our links, we may earn a small commission at no extra cost to you. We only ever recommend tools we genuinely use and love.